Understanding camera exposure
Exposure is a word with numerous meanings. Camera exposure alone features three on dictionary.com. The site even went to choose "exposure" as their Word of the Year 2014, however, for different reasons.
You may want to rotate your phone in order to improve your browsing experience on this site.
Defining camera exposure
As far as photography, i.e. camera exposure is concerned, the different meanings of the word are:
- the process of "subjecting a photosensitive medium to light" (making the click)
- "the amount of light passed to the medium" during this process (the exposure value)
- the image occurring on the medium as the result of this process (the picture)
While the first and the last of these definitions are rather straightforward, the second one requires some explanation. Understanding principles behind camera exposure in this meaning is indispensable when it comes to getting control over your camera.
Though the exact exposure value is rarely of any interest, you need to learn how different values relate to each other and what effect the changes of your camera settings will have on the exposure, and thus on your final image.
Let's start.
How cameras calculate exposure
As a beginner, you'd probably set your camera to the full auto mode, that is, a program mode with no adjustments, or use one of its scene modes such as landscape, portrait, or macro.
When you press the shutter release, your camera has to do the work to calculate the correct amount of light it will need to properly render the scene its lens is currently pointing at on its medium.
The medium question was quite important for film cameras. However, digital cameras naturally take their own very different sensor models into account when calculating exposure.
This light quantity defines a particular exposure value. To determine it, cameras actually evaluate the light being reflected by the scene and entering the lens.
This method of exposure measurement is shortened TTL, as in "through the lens".
If the camera makes an error on the positive side and overexposes, letting more light to reach its medium than necessary, the resulting image will end up with blown highlights. On the other hand, an underexposed image will lack detail in shadow areas and look too dark overall.
Getting the bearings: camera exposure elements
Exposure measurement accomplished, the camera makes adjustments to its settings ensuring its sensor – or loaded film – will receive exactly this specific amount of light. Digital cameras have three settings to consider at their disposal:
- aperture of the attached lens
- shutter speed
- ISO
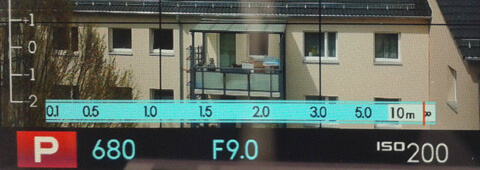
 Exposure elements on the rear LCD of a Fujifilm X100 compact camera
Note the focus point mark and depth of field preview in the blue ribbon
You might guess that there are many possible combinations of these settings that will result in the same exposure value. You would be right: all camera exposure elements are interconnected. Modifying any one of them will require another one, or both, to change in the opposite direction in order to retain the same exposure value.
When set to automatic, your camera will choose one of these combinations based on some rules etched in its software. The problem is, you don't have any control over this decision.
But why should you care? If the exposure were correct, what does it matter which exact elements contributed to it?
For once, as you probably experienced already, the automatic exposure isn't correct all the time. The reason is simple: the automatic evaluation is a preset, a programmed effort to account for different lighting conditions and various scenes. It is meant to work fairly well in the most usual situations. It just can't deal with any kind of a scene the developers of your camera didn't think of. The more complicated the lighting and challenging the composition, the bigger the chance that auto exposure will fail.
Another point is, every setting has certain side effects on the look of your final image. Even if your camera gets the exposure right, your image still might turn out far from what you had in mind when you pressed that shutter release.
By the numbers: How camera settings connect
As mentioned in the beginning, the exact, or absolute exposure value is of little interest. Camera exposure deals with relative values instead.
Two exposures 1 EV apart denote amounts of light being exact double – or half – of one another. Adding 2 EV to an exposure value quadruples the amount of light reaching the sensor. Subtracting 2 EV results in the light amount reduced to quarter its initial value.
To keep the exposure value constant when changing one of the camera settings, say, aperture by +1 EV, requires modifying another setting, e.g. ISO, by -1 EV at the same time. The same can also be achieved by changing both other settings evenly by -0.5 EV.
By the looks of it: How to choose camera settings
To explain and explore how different camera exposure elements impact the appearance of your images, refer to the separate articles listed below.
Read on, then come back for concluding exercises!
Further articles on camera exposure
- Aperture and depth of field
- Learn what aperture is, and how its different settings can change the look of your images.
- Shutter speed and motion blur
- Learn how exposure time can add dynamic and movement to your images.
- ISO and digital noise
- Learn how photo noise is related to your chosen ISO value.
- Metering modes
- Understand different metering modes and when to use them.
- Exposure compensation and bracketing
- Learn how to overcome shortcomings of your camera's automatic exposure metering.
- The sunny 16 rule and manual exposure
- Measure up to your camera and take exposure in your own hands with this simple and easy to follow rule.
Exercises
1. As you probably remember, the same exposure value can be achieved with very different settings just by combining appropriate aperture, shutter speed, and ISO.
For example, doubling the ISO will require half the amount of light to achieve the same representation of a particular scene. This can be accomplished in half the time using the same aperture, or with the same shutter speed and the aperture stopped down one pitch. All following combinations will result in the same exposure value:
- F8 125 @ 200
- F5.6 1000 @ 800
- F11 30 @ 100
- F16 500 @ 3200
- …? Add your own!
Verify if I'm correct!
Click here to see explanations.
2. Which situations, do you think, are these combinations suitable for?
Click here to see my suggestions.
3. Experiment with your camera!
- Set it to full auto and test its abilities in different lighting conditions, with different subjects and situations. Does it always get it right in terms of exposure? Are you every time satisfied with the results?
- Try different scene modes, if your camera offers any. Analyse resulting images for exposure elements. How do different modes affect your camera's decisions for choosing exposure settings? Would you decide the same way?
- Try program mode with no adjustments. Take another set of images similar to those captured in full auto. Are the results different in terms of used exposure settings?
What's next?
Congratulations! You've learned a lot. You know how your camera uses available light to adjust its settings when taking a picture. You know how exposure value is composed from its elements. You know how changing one of them will affect the others and the look of the final image.
You should be ready by now to leave full auto behind, and for good.
If still in doubt, just ask below!
Tags: #cameraexposure #photographylessons #photocourse
Other tutorial topics
- Brief history of photography
- History of photography, from the early beginnings to the present day.
- Photography composition
- Composition is ultimately what your photography stands or falls with. Even with the exposure nailed down, if your images don't engage the viewer, nobody will bother. Read here what matters in order to succeed.
Tell me what you think!
Is it useful 👍? Awful 👎? Leave a message! Your comments help make this site better (and give me a kick—one way or another).
Popular articles
-
A kind of magic
If a digital picture has to be seen in the real world, printed on a real medium and displayed in a real showcase, its transition from RAW to real is better done in an old school image editor. Enter A…
-
A duck for a dog
If you got your own place on the Internet, helping your visitors find what they are looking for is a great way to engage them and keep them staying a bit longer. A custom site search can achieve just …
-
"Might as well have the best"
Aiming for better images? Think better lenses! This is your most important piece of gear, so you better get it sorted out. — Need some advice?

 Become a patron for